

Hi friends,
I am sharing with you today a project I made wayyyy back in October of 2014 (please forgive any blurry photos). This is a fun quilted pillow project just in time for Halloween - The Quilted Skull Pillow. You can make this as scary or as cute as you like and customize your colors to your Halloween decor. This design can also be used for a custom skull quilt block for a fun Halloween quilt!

Materials needed: finished pillow measures 17.5" x 17.5"
-
26 - 3" squares of background fabric - darker colors work best
-
2 - 3" squares of white fabric for skull
-
14 - 2.5" squares of white fabric for skull
-
2 - 3.25" x 15" cuts of border fabric
-
2 - 2.25" x 19" cuts of border fabric
-
2 - 13" x 18" cuts of backing fabric for envelope back
-
5" x 7" cut of fabric for face cut outs - black works best
-
18" x 18" piece of fusible fleece for pillow front
-
Sewing machine and notions (straight pins, coordinating thread, cutting mat, rotary cutter or scissors)
Step 1:

Cut your fabrics according to the measurements above, use a 1/4" seam allowance unless otherwise noted.

First we will need to create our patchwork skull. Take 24 of your 26 dark 3" squares and group into two's right side facing each other. Take a ruler and draw a line down the middle from one point to the other with a fabric pen or pencil.

At your sewing machine using your sewing foot as a guide stitch along each side of the line leaving a 1/4" space on each side like shown. Chain stitching makes the process go by quickly and easily.

Taking your ruler and rotary cutter, cut down the center of each line - you will now have two separate HST's. Iron open your seams and trim down to 2.5" square. Follow the same steps for your two remaining 3" dark squares and your two 3" white squares.

Once you have all of your HST trimmed down to 2.5" square, lay out your skull shape in the pattern above. You will fill in the skull shape with the solid white 2.5" squares and the four half white / half dark squares you created in the step before. The darker HST will be your skull background.

Now at your machine, stitch all of your squares into rows, and your rows into the full skull shape. It helps to iron your seam allowances in the back opposite directions so that you may nest your seams together easily.


Take your two border pieces measuring 3.25" x 15" and stitch on each side of your skull piece. Once you have ironed your seam allowances flat, add your two border pieces measuring 2.25" x 19" to the top and bottom of your skull piece. Iron seams and square up your pillow front to 18" x 18".

You now have a skull quilt block or pillow front measuring 18" x 18".
Iron your fusible fleece measuring 18" x 18" to the backside of your pillow front and quilt using a coordinating thread.

Take your small piece of black fabric measuring 5" x 7" fused with heat n bond and cut out two circles for the skull's eyes, a triangle with rounded corners for the nose, and a rectangle piece for the mouth. Get creative and make the skull as sweet or as scary looking as you like.

Once you have places all of your pieces, iron them down with a hot iron - cool - and stitch around the edges with a blanket stitch or tight zig-zag on your machine. This step will complete your pillow front.

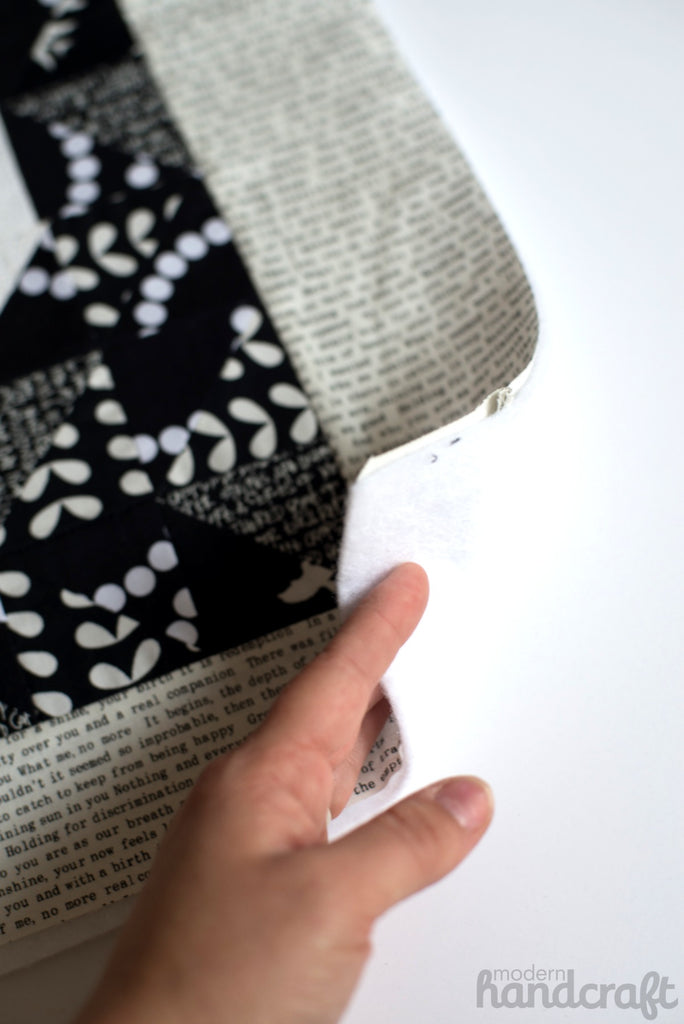
Take your two pieces of backing fabric measuring 13" x 18" and double fold one side of each (fold over 1/2" and iron, fold a second time 1/2" and iron).

Stitch along the edge of the double fold, this will finish the edges of your envelope backing. This fun backing is actually Glow in the Dark Skeletons from Timeless Treasures - I love a fun backing fabric!

Lay your pillow front right side up and place your two envelope back pieces right side down with two folded pieces towards middle. Pin in place and stitch around the entire pillow.

A quick snip of the edges and a zig - zag stitch around the pillow makes for a clean finish for the inside of your pillow. Turn right side out and poke out corners with a pointed object - and you are finished!

I used an 18" x 18" square feather stuffed pillow from Ikea for these photos.

I hope that you enjoyed today's tutorial I would love to see your finished pillows over on my facebook page - Modern Handcraft or on Instagram and tag me @modernhandcraft
-Nicole